Microsoft Lync 2013 deployment.
There are two ways of creating customised Lync 2013 deployment package, the first one is to use config.xml, the second is with OCT (Office Customisation Tool), however, there is a bug in Lync 2013.iso (SW_DVD5_Lync_2013w_SP1_32-BIT_X64_English_MLF_X19-35370.iso) that Microsoft provides that causes Lync 2013 won’t install … actually it will install when you create adminfile (.msp), so you will see “Microsoft Lync 2013” entry in Add/Remove Programs and thats about it. No sign of the software anywhere else. This is a known issue widely discussed on various websites. Why is it so annoying? Because using .msp adminfile created via OCT, you can customize installer itself much more than using config.xml file with additional scripts. You can find details bellow under “Deploying Lync 2013 using OCT and admin file” section.
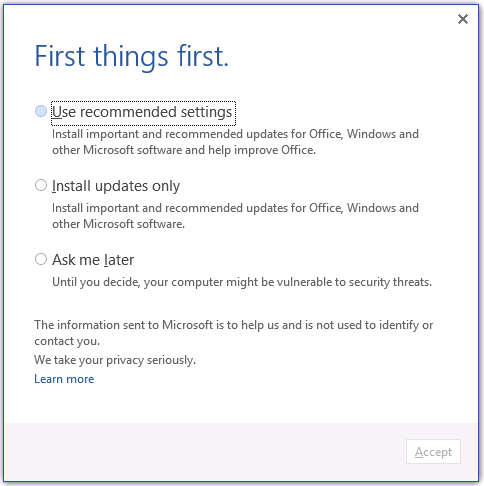
First things first.
1. Mount .iso using MagicISO, Daemon Tools or something else, or just simply extract .iso content to folder.
2. You will see setup.exe and two folders, x86 and x64. Decide which version you want to deploy. Bear in mind, x64 Lync won’t install if you already have x86 MS Office products currently installed. This was possible with Lync 2010.
3. Write down your deployment steps. In this exercise our steps are:
– uninstall Lync 2010
– install Lync 2013 (no reboot, no first-thing-first window at first launch, automatic first-time launch and configure after install, so user doesn’t have to select program from start menu, add to autostart).
Creating config.xml based deployment.
You can find sample config file within lync.ww folder, however I recommend to create your own config file with basic setup parameters using the following website.
Here’s the sample config file:
<Configuration>
<Display Level="None" CompletionNotice="No" SuppressModal="Yes" AcceptEula="Yes" />
<USERNAME Value="" />
<USERINITIALS Value="" />
<COMPANYNAME Value="Companyname" />
<PIDKEY Value="<your product key with no - in beetween>" />
<Setting Id="AUTO_ACTIVATE" Value="1" />
<Setting Id="SETUP_REBOOT" Value="Never" />
<Setting Id="HIDEUPDATEUI" Value="True" />
<INSTALLLOCATION Value="%ProgramFiles%\Microsoft Office" />
<OptionState Id="ACCESSFiles" State="Absent" Children="force" />
<OptionState Id="EXCELFiles" State="Absent" Children="force" />
<OptionState Id="XDOCSFiles" State="Absent" Children="force" />
<OptionState Id="LyncCoreFiles" State="Local" Children="force" />
<OptionState Id="OneNoteFiles" State="Absent" Children="force" />
<OptionState Id="OUTLOOKFiles" State="Absent" Children="force" />
<OptionState Id="PPTFiles" State="Absent" Children="force" />
<OptionState Id="PubPrimary" State="Absent" Children="force" />
<OptionState Id="GrooveFiles2" State="Absent" Children="foce" />
<OptionState Id="VisioPreviewerFiles" State="Absent" Children="force" />
<OptionState Id="WORDFiles" State="Absent" Children="force" />
<OptionState Id="SHAREDFiles" State="Local" Children="force" />
<OptionState Id="TOOLSFiles" State="Local" Children="force" />
</Configuration>
then create a batch file to call setup with config.xml
@echo off
@echo Installing Microsoft Lync 2013
@echo Please wait...
@Echo.
@Echo.
@Echo.

C:\<software location here>\setup.exe /config lync.ww\config.xml
Although we have specified no reboot within the config file, we still need to disable “First-thing-first” Opt-In screen (as bellow).
you can create a batch file that adds the following reg entry:
@ECHO OFF
reg add "HKEY_CURRENT_USER\Software\Microsoft\Office\15.0\Common\General" /v ShownFirstRunOptin /t REG_DWORD /d 1 /f
Automatic first-time post installation launch and autostart add.
@ECHO OFF
"C:\Program Files (x86)\Microsoft Office\Office15\lync.exe"
Depending on the way how you’ll be deploying the software, you can either put all above batch commands together in one file, or use them separately, whatever you prefer.
The problem with config.xml driven setup and batch scripts is, it does not work everytime. For example, if user locks the screen or is logged off, it will only install software with parameters specified in config.xml, thats all.
Creating .msp adminfile based deployment using OCT.
Although OCT gives you an option to uninstall any previous software … it doesn’t work :D and Microsoft doesn’t bother to fix it or do anything about it. It just doesn’t work, thats it. Deal with it! It is a small problem anyway comparing to the fact, that the original OCT included in above .iso (or DVD) just doesn’t install Lync 2013 (the same happens with SkyDrive with another .iso). It does in fact allow you to customize installer by creating adminfile, but whats the point … if it doesn’t work? :) There is a workaround for that ! ! !
So … what are the steps required to get this working?
– Download the latest version of Office Customisation Tool (OCT)
– extract files and copy the admin folder, then replace the one from initial Lync 2013 OCT setup folder.
– create MSP response file. Once you save it and run setup.exe Lync 2013 will now install itself OK.
In order to uninstall Lync 2010 you can just create a simple batch with lync2010setup.exe /uninstall /silent switch and place it in the folder along with lync2010setup.exe and this will work nicely.
Advise for Altiris users:
As the version of Lync 2013 must match the architecture with installed MS Office, to avoid a confusion with two separate filters and eliminate the need to check the MS Office architecture each time you deploy Lync which simply is a nonsense if we are talking here about batch deployment, you can create an Applicability Rule that will check the architecture of currently installed MS Office. Use registry value x64 and x86 for 32-bit Office and the policy (policies in this case) will do all that stuff for you.
Create two software deployment policies and create applicability rules respectively
– Lync 2013 x64
– Lync 2013 x86
Apply both policies to one software deployment filter, but don’t worry, only one will execute itself based on the detected version of MS Office. Having everything setup as above, your only deployment step is to add computer to software deployment filter – Altiris will check itself which version to install.

